


Neon Siege: best upgrades, every enemy and how to break the bosses
Published October 22, 2026 · Updated October 23, 2026
 Neon SiegeNeon space shooter: alien waves, upgrades, bossesPlay now
The ship in Neon Siege fires by itself, so two things decide a run: where you fly and which cards you take — and more runs are lost to the cards than to the flying. A strong run stacks two or three upgrades that multiply each other, keeps the hull topped up before every fifth sector, where a boss arrives, and never spends a hull cell on a collision it could have stepped around. Below: how to move, how to read each enemy, what every card does, which builds hold up, how the combo pays, what to buy in the hangar and how to break the three boss phases.
Fly low and move in short steps
With a mouse the ship follows the pointer; on a phone you drag anywhere and the ship moves a little further than your finger, so your thumb never sits on top of it. Arrow keys and WASD work too, and Esc or P pauses. You can fly anywhere on the screen, but the lower third is where you want to live: bullets cross more distance before they reach you, which turns every dodge into a small sidestep instead of a lunge.
Move in short taps rather than long sweeps. Aimed shots and diving darts go for the spot where you were when they launched, not where you are heading, so a one-step shift after each volley is usually all it takes. A hit costs one of your three hull cells, resets the combo and clears bullets right around the ship, then you blink for under two seconds — use that window to reposition, not to charge. Flying into an enemy also costs a cell, even though it destroys the enemy.
Read every enemy by its shape
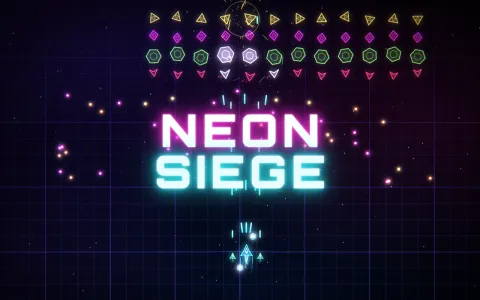
Each enemy type has its own shape, colour and attack, and new types join as the sectors climb. Pink diamonds fire a single aimed shot. Red arrowheads never shoot — they peel off the formation and dive at you, and they are the main reason to keep moving. Yellow triangles arrive in sector 2 and spin out a three-shot fan aimed at your ship. Green hexagons, from sector 3, are tough, fire a six-way ring and burst into three small fragments when destroyed, so finish them while they are high on the screen rather than directly above you.
Orange orbs (sector 4) throw a ten-bullet ring in all directions; the gaps are wide, so slip through rather than run. Violet bombers (sector 6) drop mines that drift down, blink and pop into a ring of ten bullets a couple of seconds later — shoot the mine or leave its column. Ice-blue snipers (sector 8) draw a thin aiming line, then fire a very fast needle along it. The line does not follow you once it is drawn, so one step sideways is a complete answer. Every sector also adds health to every enemy and makes them fire more often, which is why your damage has to grow as fast as the sector counter.
What each upgrade card does
After every sector you get three cards and pick one; a short video can buy a second card from the same hand. The pips under each card show its current level and how many are left. Card upgrades last for the current run only. The full deck:
| Card | What it does | Max level |
|---|---|---|
| Spread | One more bullet per level, fanned out | 4 |
| Rapid | +17% fire rate per level | 5 |
| Power | +26% damage per level | 5 |
| Pierce | Each shot passes through one more enemy per level | 3 |
| Missiles | Homing missiles every 1.3 s, one more per level | 3 |
| Orbitals | Orbs circle the ship, hit enemies and absorb enemy bullets | 4 |
| Wingmen | Two side drones fire with you; faster, then double shots | 3 |
| Arc | Hits can jump to nearby enemies as lightning | 3 |
| Crit | +10% chance per level of a 2.6x hit | 4 |
| Beam | A laser column fires straight up every few seconds | 3 |
| Ricochet | Shots bounce off the sides and top of the screen | 2 |
| Hull | One more hull cell | 3 |
| Nova | When you are hit, a blast clears bullets and hits everything nearby | 2 |
| Stasis | Enemy bullets 12% slower per level | 2 |
| Magnet | Shards and pickups fly to you from further away | 3 |
| Repair | Restores one hull cell; offered only when you are damaged | - |
Builds that hold up
Spread is the best first pick in most runs: early sectors are wide formations, and an extra stream of bullets clears a row faster than any amount of single-shot damage. Rapid and Power come next and multiply each other, and Rapid also speeds up Wingmen, so the three sit well together. Once formations stack three and four deep, Pierce turns every shot into a line through a whole column. Crit multiplies your base damage, so it pays only after a couple of Power levels.
For survival, Orbitals are the strongest single card: they swallow bullets that would have hit you and chew on anything that dives close. Nova pairs with Hull, since every extra cell is another free screen-clear. Missiles and Beam deal damage without aiming, which matters most when a boss makes you dodge more than shoot. The common mistake is one level of everything — a maxed Spread with three Power levels beats seven different cards at level one. And take Repair whenever it shows up in the hand right before a boss.
The combo multiplier and the drops
Score depends on a chain. Every kill within about two and a half seconds of the last one keeps the combo alive, and every ten kills in the chain add 25% to the points each enemy pays, up to five times the base value. Taking a hit drops it to zero. Each sector also raises enemy value by 15%, so late sectors are where scores are made — and where keeping the chain alive is worth flying a little closer to the formation.
Destroyed enemies drop shards, which drift toward you slowly; swing under them between waves or take Magnet so you don't have to. When you are damaged, enemies sometimes drop a repair heart, and the chance jumps on every 40th kill of a combo — one more reason not to break the chain.
Bosses: every fifth sector, three phases
Every fifth sector ends with a boss: a pink hexagon at sector 5, an orange octagon at 10 and a violet triangle at 15, then the cycle repeats with more health. Each time a boss loses about a third of its health, an outer layer breaks off and the pattern gets denser — aimed fans, rings, spiral arms, bullets raining from the top and darts launched straight at you.
The attack to respect is the laser. It marks a column at your position for about a second before it fires, and in the last phase it marks three at once: yours and one to each side. A short step clears it; a long dash can carry you into an outer beam. Stay low and near the centre so you have room both ways, and let Orbitals eat the spirals. When a layer breaks, the boss shrugs off damage for a moment — use that pause to reposition and grab shards.
The hangar: what to buy first
Shards you collect are kept when a run ends, and the hangar on the main menu turns them into permanent upgrades: Cannon (+8% damage per level, ten levels), Rate (+5% fire rate, ten levels), Hull (an extra starting cell, three levels, expensive), Magnet (wider pickup, five levels), Shards (+12% shard value per level, ten levels) and Head start, which deals you one random upgrade card at the start of every run for each of its three levels.
Buy two or three levels of Shards first, since they make every later purchase come sooner, then alternate Cannon and Rate, which raise the floor of every run. The first Hull level is worth saving for: one extra cell is often the difference between reaching a boss and beating it. At the end of a run a short video can double the shards from that run, and once per run a video brings you back with a full hull.
Where Neon Siege comes from
Neon Siege takes the swaying, creeping alien formation from Space Invaders, the swooping dives from Galaga and the glowing grid that ripples with every explosion from Geometry Wars, then adds card picks and bosses. If the pick-an-upgrade loop is what keeps you playing, Swarm Out runs on the same idea in an arena where a blob swarm closes in from every side. For the other classic of the era, Rock Drift is the asteroid branch of the family: drifting rocks in a wrap-around sky.
 Swarm OutSurvive the blob swarm, pick your upgradesPlay now
 Rock DriftBlast drifting rocks in a wrap-around skyPlay now
Frequently asked questions
What is the best upgrade in Neon Siege?
Spread is the best first pick in most runs, because early sectors are wide formations and an extra stream of bullets clears them fastest. After that, Rapid and Power multiply each other, Pierce pays once formations get deep, and Orbitals is the strongest defensive card.
How do I beat the bosses in Neon Siege?
Bring damage and a full hull: take Repair in the hand before every fifth sector. Stay low and near the centre, clear the laser columns with a short sidestep and let Orbitals absorb the spiral bullets. Each boss has three phases and gets a denser pattern every time it loses a third of its health.
What are shards for?
Shards drop from destroyed enemies and you keep them when the run ends. Spend them in the hangar on permanent upgrades: Cannon, Rate, Hull, Magnet, Shards and Head start.
How does the combo work?
Kills less than about two and a half seconds apart build a chain. Every ten kills add 25% to enemy points, up to five times the base, and a hit resets the chain to zero.
Do I keep my upgrades after I lose?
Card upgrades last for one run. Hangar upgrades bought with shards are permanent, and Head start adds random cards at the beginning of each run.
Guides & tips
Play it here
- Neon Siege — Neon space shooter: alien waves, upgrades, bosses
- Swarm Out — Survive the blob swarm, pick your upgrades
- Rock Drift — Blast drifting rocks in a wrap-around sky